Installing kitchen cabinets: 8 steps you should follow
Installing kitchen cabinets may seem like a complicated task, but the process is actually quite simple. The most important thing is to screw the cabinets to the wall in the correct order and make sure everything is level.
Installing the cabinets yourself can save money on installation, which requires the help of someone else or a cabinet jack. It is worth noting that kitchen cabinets should be installed before the floor. The reason is that when we install kitchen cabinets we need to move the cabinets back and forth and join them together, a process that can scratch the floor or even crack.
In short, there are eight steps to install cabinets:
Planning the space
Mark the baseline and high point layout lines
Install the upper cupboards
Hang the cabinet
Install the corner bottom cabinet
Install the remaining bottom cabinets
Install the door and kick
Check whether each cabinet part can work properly.
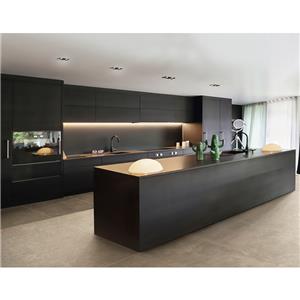
For your reference: Hanse kitchen cabinets
1. Planning the space
Tools used: A 4-foot level, a framing square, and a 2x4 ruler.
Check the walls and corners of the kitchen to make sure they are vertical.
Be aware of any scribed installations, gaskets, or wall changes.
Install electrical wiring for stoves, dishwashers, garbage disposals, refrigerators, and fume hoods before placing them in kitchen cabinets.
Install outlets every 4 feet above your countertop backsplash, and wherever you plan to use portable equipment.
Make sure the cap isn't sticking to the drain.
2. Mark the baseline and high point layout lines
Use a spirit level to draw a horizontal guide on the wall about 48 inches from the ground.
Use chalk to draw a line at these marks and measure down from this line to several places on the floor.
Mark the line where the measured distance is the shortest; this is the highest point on the floor.
Just below the high point mark, mark the height of your base cabinet, which is usually 34 inches from the ground.
From that mark, run a horizontal layout line along the wall. The top of the base cabinet is flush with this line.
Measure 17 to 18 inches up from the base cabinet layout line and snap the bottom edge of the upper cabinet with a horizontal chalk line.
Find the studs and mark their positions on the two layout lines. Drill a small hole at each mark to locate the stud.
Mark the locations of all the appliances you need.
3. Install the upper cupboards
Remove upper cabinet doors, drawers and shelves to make them lighter and easier to locate.
Label everything to make sure you can place each piece back correctly.
Place 1x3 straight splints on both sides and below the wiring of the upper cabinet. Run 2" drywall screws through it and insert every other stud. Add more splints along the length of the line.
After placing the cabinet on the floor, align the door frame of the upper corner cabinet with the door frame of the adjacent cabinet and clip them together.
Check for flush with a ruler. Drill holes on the top and bottom edges of the top frame.
Fasten the cabinets together with 2" screws.
4. Hang the cabinet
With the help of someone or a cabinet jack, lift the upper cabinet assembly and place it on the cleat.
Check the countertop with a spirit level to make sure it is vertical. If the cabinet is vertical, thread four 2.5" deck screws (with washers) through the back, top, and bottom of the cabinet and into the studs. If the cabinet is not vertical, slide spacers between the back of the cabinet and the wall where the studs are. (To pad out the bottom, remove the cleat.)
When the cabinet is vertical, screw it through the spacers to the studs.
Lift the remaining cabinets onto the cleat, align their fronts with the installed cabinets, and clamp and tighten the edges.
Shims as needed, then secure them through the shims to the studs with 2.5" deck screws and washers.
Cover any gaps between the wall and end cabinets by scoring the wall panel or back edge, or with trim.

5. Install the corner bottom cabinet
Move the corner cabinet to the correct position. Lift it up from the floor until the back edge meets the layout line.
If there are pipes, push the pad cabinets towards them and mark their position on the rear panel.
Turn the cabinet and drill holes on the back with a hole saw of appropriate size.
Use a level to check the front of the cabinet to make sure it is vertical. If not, insert spacers in the bolt positions between the floor and the bottom of the cabinet or between the wall and the back of the cabinet.
Check whether the top cabinet level, and according to the need to add below gasket. Place the cabinet against the spacers and push 0.5 inch deck screws (with washers) through the back of the cabinet and into the studs. At the spacer position, countersink and secure the cabinet to the floor with deck screws (without washers).
6. Install the remaining bottom cabinets
Starting from the installed corner cabinet, the adjacent cabinet is padded from the wall at the position of the column, and padded up from the floor, so that the face frame is vertical and the top is horizontal and flush with the layout line.
Align each cabinet so that its front face is flush with the installed neighbor. Clamp them together, drill holes in the edges of the face frame, and fasten them together with 2-inch screws.
At the gasket, pass the deck screw (with washer) through the back of the cabinet and into the stud.
Close any gaps between walls and end cabinets by marking the back edge of frames or side panels, or cover gaps with trim.
Use a utility knife to mark out and break any shims that stick out to the edge of the cabinet.
Remove all the upper cabinet support splints, and fill the screw holes with sealant.
Replace the drawers and shelves in the original cabinets.
7. Install the door and kick
Change the cupboard door. For covered doors that cover the cabinet frame, adjust the hinges so that the door hangs straight. For recessed doors, adjust the hinges so that the door is flush with the frame and has an even exposure (gap) around its perimeter.
Using a 1-inch Brad, attach the toekick trim to the bottom cabinet.
Install the longest part first, then cut and install the shorter part. Close any gaps between the floor and trim by scribing them, or cover them by nailing shoe molds to the floor.
Indent the nail heads with a nail sleeve, then cover them with wood putty or a wax stick of matching color.
If there is a top cover to trim the cabinet, miter the seams at the outer corners and treat the seams at the inner corners.
Line up the bottom edge of the mold with the horizontal layout line marked above the top of the door.
Use 1 - to 2-inch studs to secure the mold to the cabinet. Glue the end joint of the mold.
Indent the nail heads with nail covers and cover them with wood putty or a wax stick of matching color.
8. Check whether each cabinet part can work properly.
Feel free to contact us for free consultation.