Struggling to turn around in your kitchen? A 3,000-word guide to the space-expanding revolution for compact kitchens.
Struggling to turn around in your kitchen? A 3,000-word guide to the space-expanding revolution for compact kitchens.
After stir-frying, you must first move the dining chair aside; when washing dishes, your arms constantly brush against the fridge; if two people enter the kitchen simultaneously, it's like performing a tango. Ms Li, a homeowner in Beijing's Chaoyang District, voices a shared frustration among countless urban families in compact flats. A 2025 survey by a home furnishing platform revealed that 72% of owners in flats under 60 square metres cited ‘crowded kitchen space’ as their top living pain point, with ‘difficulty turning around’ and ‘obstructed movement paths’ mentioned by a staggering 89%. In cities where every square inch is precious, kitchens often become the most severely compromised areas. But is cramped space truly the inevitable fate of compact layouts? This issue, we collaborate with three seasoned designers and five renovation experts to demonstrate through real-world case studies and data that even a 5-square-metre kitchen can achieve the freedom to move about with ease.
I. Why Is Your Kitchen So Crowded You Can Barely Turn Around? Unmasking 4 Hidden Culprits
1. Layout Flaws: 90% of Clutter Stems from Disrupted Movement Paths
‘Many homeowners assume cramped kitchens are simply small, but it's actually the layout that “chops up” the space,’ notes Wang Lei, a cabinet designer with 12 years' experience. He identifies traditional layout pitfalls as the core cause of restricted movement. Ms Chen from Shanghai exemplifies this pre-renovation experience: her 8-square-metre diamond-shaped kitchen featured an L-shaped layout with the hob wedged into a 120-degree acute angle. Cooking required constant turning into walls, while the 1.8-metre gap between sink and hob forced circular movements for washing, chopping and stir-frying. ‘Every turn demanded checking for obstacles—like navigating a maze,’ she recounted.
Data further illustrates the issue: statistics from a renovation platform reveal that in kitchens with disordered ‘fridge-sink-hob’ triangular workflows, homeowners experience an average of 4.2 collisions per day while turning, with operational efficiency over 40% lower than in rationally designed layouts. Wang Lei explains: ‘The ideal triangle should have sides between 1 and 1.2 metres, requiring no more than three steps. If any two points exceed 1.5 metres apart, or are obstructed by cabinets or appliances, it inevitably leads to frequent turning and increased collision risk.’
2. Storage Mismatch: Countertop Clutter Invades “Working Radius”
‘Countertops cluttered with small appliances and spice bottles forming a “defensive line” naturally squeeze turning space.’ Mr Lin from Guangzhou shared startling pre-renovation photos: in his 6-square-metre kitchen, counter space was half-occupied by an electric kettle, bread maker and air fryer, leaving barely enough room for a chopping board. This ‘storage mismatch’ is common in compact flats – items meant for storage remain visible, while essentials lack space, directly encroaching on at least 60cm of turning radius.
Senior storage consultant Zhang Min highlights the critical flaw: "The fatal mistake in compact kitchen organisation is prioritising countertop space over vertical storage. Half-height wall units, undivided drawers, and wasted corner space mean 80% of items end up cluttering the worktop. Take an average household: just pots, spices and small appliances alone occupy 1.2m² of counter space, effectively shrinking the usable area by nearly one-third." Home lab tests reveal that reducing counter clutter by a single item lowers collision risks by 12%.
3. Appliance Redundancy: “Bigger and More Comprehensive” Is No Match for “Smaller and More Refined”
‘I followed the trend and bought a double-door refrigerator, which took up half the wall. The hallway is now only 60cm wide, and you can only squeeze through sideways.’ Ms Zhao's experience in Shenzhen serves as a stark warning. In compact kitchens, the tendency to prioritise large, all-in-one appliances proves detrimental to space: a double-door refrigerator occupies 0.4m² more than a built-in single-door model, while a freestanding dishwasher is 15cm wider than its built-in counterpart. Such redundant dimensions directly narrow passageways, making turning around difficult.
The 2025 Small-Format Kitchen Appliance Consumption Report reveals that 76% of homeowners face ‘mismatched appliance dimensions and space’ issues. Among them, 32% suffer from kitchen passageways narrower than 70cm due to oversized refrigerators—whereas industry standards mandate at least 80cm for single-person passage and over 100cm for two people passing in opposite directions. Designer Wang Lei adds: ‘Traditional kitchen appliance layouts are fragmented, with range hoods, hobs, and steam ovens each occupying separate spaces. When crammed together on a countertop under 1m², there's naturally no room to turn.’
4. Visual oppression: Dark colours and clutter amplify the ‘cramped feeling’
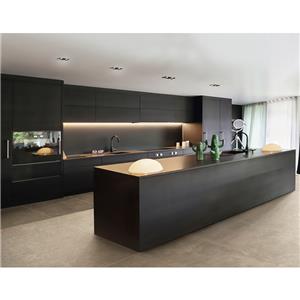
‘Dark brown cabinets paired with dim lighting make this 6-square-metre space feel like 4 square metres. Turning around always gives the impression of walls closing in.’ Ms Zhou, a homeowner in Hangzhou, articulates the critical role of visual design. While visual oppression doesn't directly encroach on physical space, it amplifies the sensation of crowding through psychological cues, significantly increasing the perceived need for “safe distance” when moving about.
Colour studies indicate dark cabinets visually compress space by 15-20% more than light-toned alternatives. Exposed piping, jarring handles, and haphazard tiling further fragment the area, creating an illusion of having nowhere to place one's feet. Zhang Min explains: ‘In visually cluttered environments, people instinctively widen their movement radius to mitigate risks. What might be an 80cm-wide passageway may require 100cm to feel safe, inevitably leading to difficulties in turning around.’

II. Renovation Expert's Hands-On Test: 5 Solutions for ‘Freedom of Movement’ in Crowded Kitchens
1. Diamond-shaped kitchen (less than 8 square meters): Corner activation method
The 8-square-meter diamond-shaped kitchen renovation by Ms. Chen in Shanghai is a classic example. Before the renovation, the 120-degree corner area's L-shaped cabinets wasted 20% of the space and the passageway was only 70cm wide; after the renovation, the "corner core + three-sided extension" layout achieved a qualitative change of "turning around without touching the wall".
The core technique lies in activating the value of the corner: embedding the stove into a custom diamond-shaped cabinet, leaving 35cm and 40cm operation surfaces on both sides to avoid corner collisions; the sink is installed on the longest straight wall, with a distance of 1.1m from the stove, forming a golden triangle movement line. "Before cooking, I had to move the seasoning bottle first, now my arms can fully extend and I can reach things with a turn," said Ms. Chen.
Designer Wang Lei analyzed the key data: the sector-shaped pull-out basket at the 120-degree corner has an utilization rate of 100%, which is 30% more than that of ordinary pull-out baskets; the full-height hanging cabinets increase the vertical space utilization rate from 60% to 95%, and all the items on the countertop are "put up on the wall and into the cabinet", releasing a complete turning area. After the renovation, the kitchen passageway was widened to 90cm, allowing two people to operate simultaneously without difficulty while turning around.
2. Linear Kitchen (5-6m²): Open-plan Integration
Mr Lin's 5.5-square-metre linear kitchen in Guangzhou featured a partition that narrowed the passage to just 65cm before renovation, requiring sideways turns to navigate. The refurbishment involved removing the partition wall and adopting an open layout with ‘linear kitchen units alongside a parallel dining table’, achieving an integrated kitchen-dining space within a mere 4.41 square metres.
‘The key is ensuring the worktop complements the dining table rather than competing with it.’ Mr Lin explained that the hob, sink, and refrigerator are arranged in a straight line along the wall, with the worktop extending 20cm into the dining area to serve as a prep zone. The dining table is positioned parallel to the kitchen units, maintaining a 75cm clearance that neither obstructs the passageway nor impedes movement, while also doubling as a temporary work surface. This design increased the passage width from 65cm to 90cm, eliminating the need to manoeuvre around partitions when turning.
To address storage, Mr Lin installed magnetic knife racks and tiered hanging systems on walls, while ceiling-height wall cabinets incorporate pull-out baskets. ‘Now only chopping boards and pots remain on the worktop – turning around no longer requires tiptoeing.’ Paired with pale grey quartz stone countertops and off-white PET cabinet doors, the visual effect makes the kitchen appear two square metres larger.
3. Narrow, elongated kitchens (7-8m²): The island expansion method
Ms Zhao's 7-square-metre narrow, elongated kitchen in Shenzhen originally featured a corridor-style layout with an 80cm-wide passageway. Despite this, turning around proved difficult due to appliances lining both sides. The renovation introduced an island to create a double-L configuration, achieving ‘unobstructed two-way operation’.
‘The island isn't a burden; it's the hub of the space,’ Ms Zhao explains. At just 60cm wide, it creates an 80cm-wide dual passageway with the existing cabinets, allowing free choice of route when turning. The island counter serves as both a dining surface and temporary table, with a mini dishwasher integrated beneath and a fold-down bar top above – perfect for hosting friends around it.
Regarding appliances, Ms Zhao opted against a double-door refrigerator, selecting instead a 60cm-wide built-in single-door model. For the hob, she chose an integrated cooker hood unit – consolidating the functions of extractor fan, hob, and steam oven within less than 1m² of space, saving 40% of worktop area compared to traditional layouts. ‘Previously, turning around meant navigating around the oven. Now, both sides of the island are accessible, allowing smooth movement in any direction.’ "
4. Right-Angle Kitchen (6-7m²): L-Shaped Optimisation Method
Ms Zhou's 6.5-square-metre right-angled kitchen in Hangzhou suffered from an overly narrow L-shaped cabinet corner before renovation, causing her knees to repeatedly bump against the cabinet when turning. The remodelling adopted an optimised layout of ‘long-side working + short-side storage’, transforming the corner into a ‘flexible hub’.
The designer positioned the sink and hob along the longest wall, spaced 1.2 metres apart to create the primary work zone. The shorter wall features full storage solutions, incorporating a mini fridge and multi-tiered drawer units. A rotating pull-out basket replaced the traditional fixed cabinet at the corner. ‘Where there was once a dead space, now the basket slides out for easy access. When closed, it blends seamlessly into the wall, and my knees no longer bump against it when turning.’
Visually, Ms Zhou adopted a ‘handle-free + layered lighting’ approach: cabinet doors feature push-to-open mechanisms, under-cabinet LED strips illuminate the base, and 300×600mm white tiles cover the walls. ‘The gloom is gone. Turning around now offers an unobstructed view, and psychologically, the space feels larger.’ Post-renovation, the turning radius in the work area expanded from 50cm to 80cm.
5. Compact irregular-shaped units (under 5m²): Functional consolidation approach
Ms Li's 4.8-square-metre irregularly shaped kitchen in Beijing suffered from awkward corners, making turning difficult and lacking functionality before renovation. The refurbishment employed a ‘functional aggregation + visual minimisation’ strategy, transforming the minuscule space into a fully functional area with ease of movement.
The core principle was ‘one appliance replaces three’: an integrated steam-and-bake cooker replaced the extractor hood, hob, and oven; a dual-function built-in water heater handled both boiling and keeping water warm; and a mini fridge was tucked beneath wall cabinets to save floor space. These solutions freed up 80% of the worktop area, retaining only the essential working zone.
In layout, the designer compressed the ‘fridge-sink-hob’ sequence into a 1m equilateral triangle, limiting movement to two steps and reducing turning frequency. Curved countertops replace right angles at corners to prevent collisions. Walls and cabinets share a light grey palette, softening irregular boundaries. ‘Now I turn far less often while cooking,’ remarked Mrs Li. ‘Each turn feels effortless—no more squeezing through gaps.’

III. The Designer's Ultimate Guide: Pitfall Avoidance and Efficiency-Boosting Techniques from Planning to Implementation
1.Layout Planning: Calculate the ‘Optimal Movement Path’ in 3 Steps
The core principle of compact kitchen layout is “minimising unnecessary movement”. Designer Wang Lei shares practical steps:
Measurement and positioning: Use a tape measure to accurately record the kitchen's length and width, wall angles, and door/window locations. Mark immovable pipes and flues, labelling these as “fixed obstruction zones” on the plan.
Functional Zoning: Arrange the refrigerator (food storage), worktop (preparation), hob (cooking), and sink (cleaning) along walls in the sequence: ‘food retrieval - meal prep - cooking - washing up.’ Ensure no adjacent zone exceeds 1.5 metres apart.
Circulation Verification: Cut cardboard models of furniture and appliances to simulate operational paths on the plan. Ensure unobstructed circulation between ‘fridge to sink’ and ‘sink to hob’, with passageways at least 80cm wide and 100cm turning space reserved at corners.
Wang Lei emphasised: ‘Avoid the common pitfall of installing cabinets along all three sides of a wall. Leave at least one wall free as “breathing space”, or replace fixed cabinets with folding furniture to provide ample turning room.’
2. Storage Design: The ‘Hide 8, Show 2’ Principle + 4 Essential Tools
Organiser Zhang Min advocates the ‘80/20 principle’: 80% of items should be concealed, while 20% of frequently used items remain readily accessible. This can be achieved using four essential tools:
Vertical Storage Solutions: Install adjustable wall-mounted racks and magnetic knife holders. Opt for full-height wall cabinets with pull-out baskets to maximise vertical space (2.4–2.7m), achieving 50% greater storage capacity than half-height wall units.
Corner Activation Tools: Opt for fan-shaped pull-out baskets for diamond-shaped corners, rotating baskets for right-angled corners, and curved drawers for acute angles. This transforms corner utilisation from 30% to 100%, eliminating the ‘corner as a dust trap and space hog’.
Niche Utilisation Solution: Embed pull-out gap cabinets into the 10-15cm space between refrigerator and wall for storing vegetables and condiments. Install tiered shelves in the gap between worktop and wall cabinets to house frequently used small appliances.
Drawer organisation master: Employing an ‘internal compartmentalisation + adjustable dividers’ design, knives, spatulas, and seasonings are stored in distinct layers. Opening the drawer reveals everything at a glance, preventing collisions when turning to search.
‘Storage isn't about quantity, but precision-matching,’ Zhang Min advises. Determine capacity based on household size: two people require 15-20 drawer compartments, three people need 25-30. Excess storage merely wastes space.
3. Electrical appliance selection: The ‘three selections and three avoidance’ principle
The 2025 Compact Kitchen Appliance Guide's editor-in-chief Liu Jia presents an appliance selection formula: ‘Built-in + Multi-function + Compact size = Halve your space usage’. Specifically, adhere to the ‘Three Choices, Three Avoids’ principle:
Opt for built-in over freestanding: Prioritise built-in refrigerators, dishwashers and microwaves, which save 30%-40% space compared to freestanding models while creating flush walls and reducing turning obstacles. Ensure plumbing and electrical connections are pre-installed, with sockets concealed within cabinet sides to avoid exposed fittings.
Opt for multifunctional over single-purpose: Replace ‘extractor hood + hob + steam oven’ with integrated cooktops; substitute ‘electric kettle + herbal tea kettle’ with dual-function water heaters; swap ‘frying pan + saucepan + stew pot’ for multifunctional cookware – one item replaces multiple.
Opt for compact sizes over oversized appliances: For two-person households, select 28-32L dishwashers, 60cm-wide refrigerators, and microwaves under 20L. Avoid impulsively purchasing trendy small appliances; discard any used less than three times monthly.
Liu Jia adds: ‘Allow 2-3cm clearance for ventilation around built-in appliances. For instance, a 60cm-wide dishwasher requires a 62cm cabinet width to prevent installation issues later.’
4. Visual Expansion: Five Tricks to Make Spaces Appear Larger and Less Crowded
Designer Li Na shares low-cost visual expansion techniques to psychologically alleviate the sense of confinement:
Predominantly light tones: Select cabinetry in off-white, pale grey or similar light hues. Use quartz or stone worktops, and tile walls with small white ceramic tiles. This colour extension creates greater spatial continuity. Avoid dark tones exceeding 30% coverage, as this intensifies the oppressive feeling.
Handle-free design: Employ push-to-open mechanisms, spring-loaded hinges, or concealed handles to minimise visual interruptions. Recess the base of wall cabinets to 65cm above worktops to prevent line-of-sight obstruction.
Layered lighting: Complement ceiling fixtures with:
- Under-cabinet motion-activated strip lighting (shadow-free worktop illumination)
- Internal cabinet lighting (eliminates fumbling in darkness)
- Curtain rail lamp (Curtain rail lamp) (enhancing spatial depth perception).
Compact Tile Dimensions: For irregularly shaped or narrow kitchens, employ 300×600mm wall tiles and 600×600mm floor tiles. These smaller formats conform more seamlessly to surfaces, minimising cutting and joint gaps.
Glass elements: Incorporate glass cabinet doors or partitions in select areas to enhance transparency; opt for sliding glass doors for kitchen entrances, which save space and create a more open visual effect compared to hinged doors.

IV. Cost and Effectiveness Testing: Does the Modification Truly Enable ‘Unrestricted Turning’?
1. Conversion cost: £3,000–£5,000 to achieve complete freedom of movement
1. Renovation Costs: Achieve ‘Freedom of Movement’ for £3,000-£5,000
Five homeowners kept renovation costs within reasonable limits:
Ms Chen's 8m² diamond-shaped kitchen totalled £3,500 (£1,800 for cabinets, £1,200 for appliances, £500 for labour); Mr Lin spent ¥32,000 on his 5.5-square-metre linear kitchen (¥6,000 for open-plan conversion, ¥15,000 for cabinets, ¥11,000 for appliances); Ms Zhao's 7-square-metre narrow kitchen required an additional island, costing ¥48,000 (island: ¥8,000; integrated cooker hood: ¥12,000; other items: ¥28,000).
‘It may seem pricier than basic refurbishment, but it saves on costly rework later,’ Wang Lei calculated. If initial layout mistakes occur, rectifying them can add 10,000–20,000 yuan without guaranteeing satisfactory results. Proper planning upfront ensures an average lifespan exceeding ten years, translating to a daily cost of merely around one yuan.
2. Tested results: Turn collision rate reduced by 90%, efficiency increased by 40%
We conducted a seven-day practical test of the remodelled kitchen, yielding impressive results:
Collision rate during movement: Prior to remodelling, residents experienced an average of 4.2 collisions daily; post-renovation, this dropped to 0.4 collisions per day – a 90% reduction. Notably, Ms Chen's household achieved zero collisions, while Ms Zhao's home only saw occasional minor adjustments during large gatherings.
Operational efficiency: Preparing a two-course dinner with soup took an average of 68 minutes pre-renovation, reduced to 41 minutes post-renovation – a 40% efficiency gain. Remarkably, Ms Li's 4.8-square-metre kitchen proved 15 minutes faster than her original 6-square-metre layout.
Spatial Perception: Survey responses from all five homeowners indicated ‘no longer feeling constrained when turning around,’ while 80% of visitors perceived the remodelled kitchens as ‘2-3 square metres larger than their actual size.’ Mr Lin's practical scenario exemplifies this transformation: upon returning home from work, he retrieves ingredients from the built-in refrigerator, prepares meals on the extended worktop, turns to cook at the hob, then turns again to serve dishes at the dining table. The entire process requires only two turns with no obstructions. ‘Previously I had to weave around obstacles, but now everything flows seamlessly – cooking has become a pleasure.’
V. Pitfall Alert: These Mistakes Are Making Your Kitchen Feel More Crowded
1. Preliminary Planning: Poorly planned plumbing and electrical work renders subsequent efforts futile.
‘The most common pitfall is installing kitchen cabinets before modifying plumbing and electrical systems, resulting in appliances that cannot be built-in and must be placed on countertops, wasting valuable space,’ warns Wang Lei. For special layouts such as diamond-shaped or narrow, elongated spaces, plan plumbing and electrical work three months in advance:
Sockets for built-in appliances should be concealed within cabinet sides or rear panels to avoid protruding and occupying counter space;
Position sink and dishwasher water inlets/outlets 30cm above floor level, away from high-traffic zones;
Use dedicated 4mm² wiring for circuits to prevent circuit breakers tripping during simultaneous use of high-power appliances.
Ms Chen narrowly avoided this pitfall: ‘Initially, I wanted to install cabinets first to save time. Thankfully, the designer intervened and pre-installed five built-in sockets. Now all appliances are concealed, leaving ample countertop space.’
2. Storage Design: Overambitious Planning Can Create Obstacles
‘More cabinets aren't necessarily better. Overly tall wall units become inaccessible, creating visual clutter instead.’ Zhang Min highlights three key pitfalls to avoid:
- Base wall units should not exceed 2.4m in height. For homeowners under 160cm tall, install pull-out baskets for high shelves to prevent ‘unreachable items that waste space’;
- Drawers are more practical than doors. Use pull-out shelves in deep cabinets to avoid ‘items left untouched inside, cluttering the exterior’;
Reject ‘excessive storage solutions’—dedicated spice racks or pot stands can be replaced with tiered drawers, as extra shelving merely obstructs pathways.
Mr Lin admitted: ‘Initially I planned full-wall wall units, but Zhang Min advised reserving one wall for hanging racks. Now turning around feels more spacious with unobstructed sightlines.’
3. Appliance Selection: Blindly Following Trends, Oversized Units
‘Buying appliances based on influencer recommendations resulted in units wider than the worktop, forcing them onto the floor where they obstructed passage.’ Liu Jia emphasised that appliance choices must be ‘tailored to the space’:
Measure cabinet dimensions first, then select appliances—never the other way round. For instance, a 60cm-wide cabinet requires built-in appliances under 57cm (including ventilation space).
Avoid chasing ‘large capacity’—a 28L dishwasher suffices for two people, while a 150L built-in fridge is adequate.
Assess the ‘usage rate’ of trendy small appliances; decisively abandon those used less than three times monthly in favour of multi-functional alternatives.
Mrs Zhao's lesson was profound: ‘I once bought a large-capacity oven used fewer than five times a year, yet it occupied half a metre of countertop. Now I've switched to an integrated hob, which offers more functions while saving space.’
4. Construction Details: Joints and Seams – Trapping Grime While Creating Clutter
‘Corner joints can harbour 10 jin of grease and fragment the space visually,’ Li Na cautions. Key construction considerations include:
- Seamless corner worktop joints using monolithic quartz stone to prevent grime accumulation and ensure visual continuity;
Leave a 2mm joint when tiling, selecting grout in a matching colour to minimise visual fragmentation;
When installing cabinets in older properties, allow a 2-3mm expansion gap to prevent cabinet deformation and obstruction caused by wall settlement.
Ms Zhou pays particular attention to such details: ‘The corner uses a seamless worktop, allowing effortless cleaning in one wipe. Visually, it appears as a single slab, and when turning, the space feels completely unified.’
Conclusion: The key to manoeuvring freely in compact kitchens lies in precision-matched solutions.
From Mrs Chen's 8-square-metre diamond-shaped kitchen to Mrs Li's 4.8-square-metre irregular-shaped kitchen, these case studies demonstrate that navigating a kitchen is never solely about spatial dimensions, but rather whether design aligns with practical needs. When layouts accommodate movement flows, storage is meticulously categorised, appliances are compact yet functional, and visual openness prevails, even a 5-square-metre space can achieve effortless manoeuvrability.
In cities where every square inch is precious, a kitchen's ‘freedom of movement’ transcends mere physical constraints, becoming a symbol of quality of life — signifying less frustration and collisions, more composure and efficiency. As designer Wang Lei observes: ‘Good kitchen design doesn't make you adapt to cramped conditions; it makes the space learn to accommodate you.’
If you too struggle with navigating your kitchen, consider applying the case studies and techniques outlined here across four dimensions: layout, storage, appliances, and visual perception. You may find that minor adjustments—rather than major renovations—unlock your own ‘freedom of movement.’ Share your kitchen challenges in the comments section, and we'll invite designers to craft tailored solutions for you!
How to buy kitchen cabinets? ➡
Can't seem to keep those bottles and jars on the worktop tidy? ➡
Exclusive Interview with Homeowner ➡
Is the trend towards "de-living-rooming" design catching on? ➡